MOTOSHARE 🚗🏍️
Rent Bikes & Cars Directly from Owners
Motoshare connects vehicle owners with people who need bikes and cars on rent. Owners earn from idle vehicles, and renters get flexible ride options.
Visit MotosharePicture this: you’ve just landed at Ngurah Rai International Airport after a long flight, jet-lagged and eager to reach your Bali accommodation. The last thing you want is to stand in another queue, fumbling with paperwork and trying to communicate your data needs in a foreign language.
This is where eSIM for Bali travelers shines. You have two main options: purchase and install an eSIM before your flight for immediate connectivity upon landing, or buy one at the airport with face-to-face assistance. Both approaches have distinct advantages depending on your travel style, technical comfort level, and specific needs.
This comprehensive guide compares both methods, helping you choose the best approach for your Bali adventure. We’ll cover costs, convenience factors, troubleshooting options, and provide step-by-step instructions for both scenarios.

Option 1: Installing Your eSIM Before Departure
Why Pre-Install Your Bali eSIM?
Immediate Connectivity
- Internet access the moment you turn off airplane mode
- No waiting in airport queues after a long flight
- Instant access to maps, translation apps, and ride-hailing services
Stress-Free Arrival
- Skip language barriers and complex explanations
- Avoid decision fatigue when tired from travel
- Focus on getting to your accommodation quickly
Better Planning
- Research and compare plans thoroughly at home
- Read reviews and check coverage maps
- Install and test while you have support from home country
Time Savings
- Airport SIM purchases can take 30-60 minutes during peak times
- Pre-installation takes 5-10 minutes in comfortable home environment
- More time for exploring Bali instead of administrative tasks
Best Providers for Pre-Purchase eSIMs
International eSIM Providers
- Airalo: Wide coverage, tourist-friendly interface, multiple plan options
- Holafly: Unlimited data plans, good customer support, easy installation
- Nomad: Competitive pricing, flexible validity periods, reliable coverage
Indonesian Carrier eSIMs
- Telkomsel: Best coverage including remote areas, official local provider
- Indosat: Good value for money, strong urban coverage
- XL Axiata: Budget-friendly options, improving network quality
Pre-Purchase Process Step-by-Step
1. Research and Compare (1-2 weeks before travel)
- Compare data allowances, validity periods, and prices
- Check coverage maps for your specific Bali destinations
- Read recent customer reviews and ratings
- Verify your phone’s eSIM compatibility
2. Purchase Your Plan (3-7 days before departure)
- Buy through official provider websites or authorized resellers
- Provide required documentation (passport details, travel dates)
- Choose payment method (credit card, PayPal, etc.)
- Save confirmation emails and activation codes
3. Pre-Installation Testing (1-2 days before travel)
- Download the eSIM profile to your device
- Test installation process without activating
- Verify settings and configuration
- Contact customer support if issues arise
4. Activation Upon Arrival
- Turn off airplane mode after landing
- Activate the eSIM profile
- Test connectivity with web browsing or messaging
- Troubleshoot any issues with saved support contacts
Option 2: Buying eSIM at Ngurah Rai Airport
Airport eSIM Advantages
Face-to-Face Support
- English-speaking staff available 24/7
- Immediate troubleshooting assistance
- Physical demonstration of installation process
- Instant resolution of compatibility issues
No Pre-Planning Required
- Make decisions based on actual travel needs
- Adjust plans based on final itinerary
- No risk of purchasing wrong plan type
- Flexibility for last-minute travel changes
Official Provider Presence
- Direct access to Telkomsel, Indosat, and XL representatives
- Authentic plans with full warranty and support
- Latest promotional offers and packages
- Immediate customer service registration
Airport eSIM Locations and Hours
Terminal Locations
- International Arrivals: Multiple kiosks after baggage claim
- Domestic Arrivals: Smaller selection, mainly Telkomsel
- Departure Areas: Limited options, higher prices
- Transit Areas: Basic plans available for connecting passengers
Operating Hours
- Major Providers: 24/7 service during flight arrival times
- Peak Staffing: 6 AM – 11 PM daily
- Reduced Service: Late night/early morning may have limited staff
- Holiday Schedule: Check for modified hours during Indonesian holidays
Languages Supported
- Indonesian (Bahasa Indonesia)
- English (most staff)
- Basic Mandarin (some locations)
- Japanese (limited availability)
Airport Purchase Process
1. Locate eSIM Kiosks
- Follow “SIM Card” or “Mobile Internet” signs
- Look for provider logos (Telkomsel, Indosat, XL)
- Ask airport information desks for directions
- Kiosks are typically near currency exchange counters
2. Choose Your Provider and Plan
- Compare offerings from different providers
- Consider your Bali travel destinations for coverage
- Ask about current promotions or tourist packages
- Verify eSIM availability (not all plans support eSIM)
3. Provide Documentation
- Present original passport (photocopies not accepted)
- Provide local accommodation address
- Show return flight details if requested
- Allow staff to photograph documents for registration
4. Device Compatibility Check
- Staff will verify your phone supports eSIM
- Check if device is unlocked for Indonesian networks
- Test eSIM installation capability
- Resolve any compatibility issues before purchase
5. Installation and Testing
- Staff assists with eSIM profile download
- Test data connectivity and speeds
- Verify SMS and calling functionality (if included)
- Save customer service contacts and account information
Cost Comparison: Pre-Purchase vs Airport
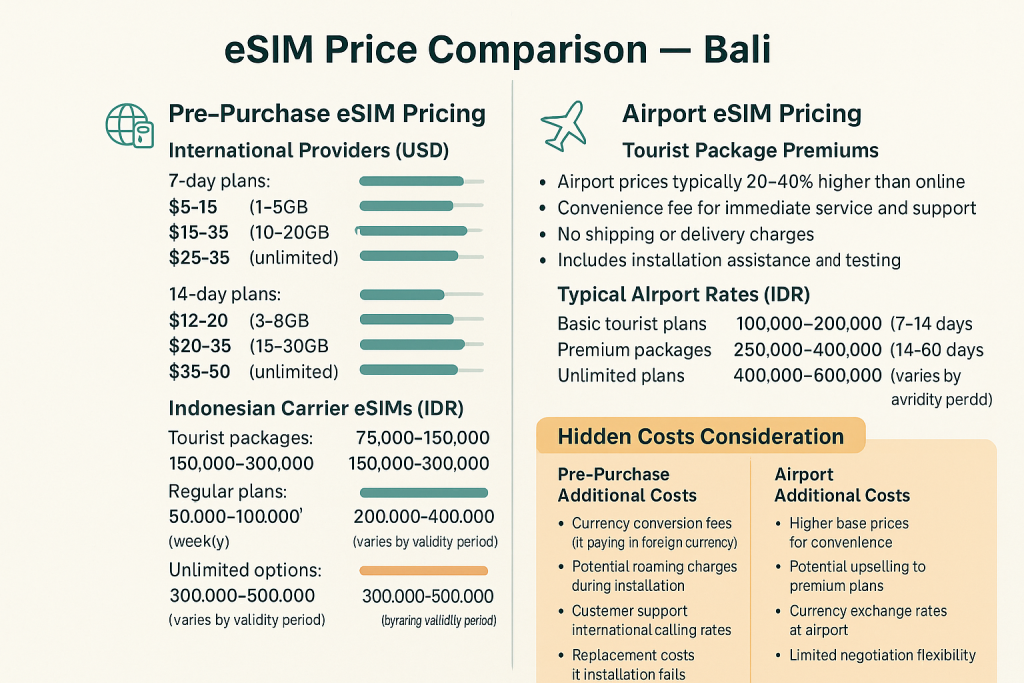
Pre-Purchase eSIM Pricing
International Providers (USD)
- 7-day plans: $8-15 (1-5GB), $15-25 (10-20GB), $25-35 (unlimited)
- 14-day plans: $12-20 (3-8GB), $20-35 (15-30GB), $35-50 (unlimited)
- 30-day plans: $18-30 (5-15GB), $30-50 (25-50GB), $50-80 (unlimited)
Indonesian Carrier eSIMs (IDR)
- Tourist packages: 75,000-150,000 (7 days), 150,000-300,000 (14 days)
- Regular plans: 50,000-100,000 (weekly), 200,000-400,000 (monthly)
- Unlimited options: 300,000-500,000 (varies by validity period)
Airport eSIM Pricing
Tourist Package Premiums
- Airport prices typically 20-40% higher than online
- Convenience fee for immediate service and support
- No shipping or delivery charges
- Includes installation assistance and testing
Typical Airport Rates (IDR)
- Basic tourist plans: 100,000-200,000 (7-14 days, 3-10GB)
- Premium packages: 250,000-400,000 (14-30 days, 20-50GB)
- Unlimited plans: 400,000-600,000 (varies by provider and duration)
Hidden Costs Consideration
Pre-Purchase Additional Costs
- Currency conversion fees (if paying in foreign currency)
- Potential roaming charges during installation
- Customer support international calling rates
- Replacement costs if installation fails
Airport Additional Costs
- Higher base prices for convenience
- Potential upselling to premium plans
- Currency exchange rates at airport
- Limited negotiation flexibility
Coverage and Performance Comparison
Network Quality Factors
Pre-Purchase International eSIMs
- Often use multiple local networks for redundancy
- May have lower priority on network traffic
- Coverage depends on partner agreements
- Performance can vary by location and time
Direct Carrier eSIMs (Airport or Online)
- Full access to carrier’s native network
- Highest priority network traffic
- Complete coverage of carrier’s infrastructure
- Consistent performance standards
Bali Coverage Considerations
South Bali (Tourist Areas)
- All options provide excellent coverage
- High-speed 4G/5G widely available
- Multiple towers ensure redundancy
- Performance differences minimal
Central Bali (Ubud, Cultural Sites)
- Telkomsel offers best coverage
- International eSIMs may have gaps
- Mountain areas can be challenging
- Local carrier eSIMs recommended
Remote Areas (North/East Bali)
- Telkomsel essential for reliable coverage
- International eSIMs often inadequate
- XL and Indosat coverage limited
- Consider local carrier for comprehensive access
Island Hopping (Nusa Penida, Gili Islands)
- Telkomsel provides most reliable inter-island coverage
- International eSIMs may not cover smaller islands
- Check specific coverage maps before choosing
- Local carrier eSIMs offer best connectivity
Installation and Setup Guide
Pre-Departure Installation
Preparation Steps
- Ensure phone is eSIM compatible and unlocked
- Update to latest iOS/Android version
- Connect to stable Wi-Fi network
- Have activation codes and instructions ready
Installation Process
- iPhone: Settings > Cellular > Add Cellular Plan
- Android: Settings > Network & Internet > Mobile Network > Add Carrier
- Scan QR code or enter activation details manually
- Label the plan (e.g., “Bali eSIM”)
- Configure data and calling preferences
Pre-Activation Testing
- Verify eSIM profile is installed but not activated
- Check settings and configuration options
- Test switching between home SIM and eSIM
- Save customer support contact information
Activation Upon Arrival
- Turn off airplane mode after landing
- Select Bali eSIM as active data line
- Test internet connectivity with web browsing
- Verify location services and apps work properly
Airport Installation with Staff Assistance
What to Expect
- Staff will handle most technical aspects
- You’ll need to unlock your phone for installation
- Process typically takes 10-15 minutes
- Testing and verification included in service
Your Role in the Process
- Provide phone unlock code/biometric access
- Confirm installation steps as staff explains
- Test connectivity under staff guidance
- Ask questions about plan features and limitations
Post-Installation Checklist
- Verify data allowance and validity period
- Test calling and SMS functionality (if included)
- Save customer service numbers in contacts
- Understand top-up procedures if needed
Troubleshooting Common Issues
Pre-Purchase eSIM Problems
Installation Failures
- Cause: Incompatible device or locked phone
- Solution: Verify eSIM support and carrier unlock status
- Prevention: Test compatibility before purchase
Activation Issues
- Cause: Incorrect activation timing or location
- Solution: Follow provider’s specific activation instructions
- Prevention: Read activation guidelines carefully
No Data Connection
- Cause: Incorrect APN settings or network selection
- Solution: Manually configure APN settings from provider
- Prevention: Save APN details before travel
Customer Support Challenges
- Cause: Time zone differences and language barriers
- Solution: Use chat support or email for non-urgent issues
- Prevention: Test installation before departure
Airport eSIM Problems
Long Wait Times
- Cause: Peak arrival times and limited staff
- Solution: Visit during off-peak hours if possible
- Prevention: Consider pre-purchase for busy travel periods
Language Barriers
- Cause: Limited English proficiency of some staff
- Solution: Use translation apps or ask for English-speaking staff
- Prevention: Learn basic Indonesian phrases for SIM purchases
Compatibility Issues
- Cause: Older phones or carrier-locked devices
- Solution: Staff can test compatibility before purchase
- Prevention: Verify phone specifications before travel
Plan Confusion
- Cause: Multiple options and promotional packages
- Solution: Ask staff to explain differences clearly
- Prevention: Research typical data usage needs beforehand
Which Option is Right for You?
Choose Pre-Purchase eSIM If You:
Value Convenience and Speed
- Want immediate connectivity upon landing
- Prefer to handle technical setup in comfortable environment
- Have experience with eSIM technology
- Travel frequently and understand your data needs
Have Specific Requirements
- Need unlimited data or specific plan features
- Travel to remote areas requiring specific carrier coverage
- Want to compare multiple providers thoroughly
- Prefer to avoid airport crowds and queues
Tech-Savvy
- Comfortable troubleshooting technical issues independently
- Have reliable customer support access methods
- Understand eSIM installation and configuration
- Can research and compare options effectively
Choose Airport Purchase If You:
Prefer Personal Assistance
- Want face-to-face support during installation
- Need help choosing the right plan for your needs
- Prefer immediate troubleshooting assistance
- Are not comfortable with self-installation
Have Flexible Travel Plans
- Itinerary may change affecting data needs
- Want to make decisions based on actual travel requirements
- Prefer to see all options before choosing
- Don’t mind spending extra for convenience
Value Immediate Resolution
- Want instant solutions to any compatibility issues
- Prefer official carrier support and warranty
- Need immediate testing and verification
- Want local customer service registration
Hybrid Approach
Research Online, Buy at Airport
- Research plans and pricing before travel
- Compare options but purchase with staff assistance
- Get best of both worlds: knowledge and support
- Reduce airport decision time while maintaining assistance
Money-Saving Tips and Best Practices
Maximizing Value
Pre-Purchase Savings
- Compare multiple providers and plan options
- Look for promotional codes and discounts
- Consider longer validity periods for better per-day rates
- Buy during off-peak seasons for better deals
Airport Negotiation
- Compare prices between different provider kiosks
- Ask about current promotions or package deals
- Consider bundling with other services (airport transfer, etc.)
- Pay in local currency to avoid conversion fees
Smart Usage Strategies
Data Management
- Download offline maps and translation apps before activation
- Use Wi-Fi at accommodations and restaurants when available
- Monitor usage through provider apps or phone settings
- Consider unlimited plans for heavy usage or hotspot sharing
Plan Optimization
- Choose plan duration matching your actual stay
- Consider data-only plans if you use messaging apps primarily
- Factor in any domestic travel within Indonesia
- Account for higher usage during first few days (navigation, bookings)
Avoiding Common Mistakes
Pre-Purchase Pitfalls
- Don’t activate until you arrive in Indonesia
- Verify coverage for all your planned destinations
- Keep activation codes secure and accessible
- Test installation process before departure
Airport Purchase Mistakes
- Don’t rush into first plan offered
- Compare options from multiple providers
- Verify plan features match your needs
- Keep all documentation and receipts
Choose Your Bali eSIM Strategy
Both pre-purchase and airport eSIM options offer distinct advantages for Bali travelers. Your choice depends on your priorities: convenience and immediate connectivity versus personal assistance and flexibility.
Pre-purchased eSIMs excel for tech-savvy travelers who value efficiency and have clear data requirements. The ability to land in Bali with immediate internet access is invaluable for navigation, communication, and ride-hailing services.
Airport purchases work best for travelers who prefer personal assistance, have flexible plans, or want to make informed decisions with expert guidance. The premium you pay for airport convenience often includes valuable support and immediate problem resolution.
Consider your travel style, technical comfort level, and specific Bali itinerary when making your decision. Regardless of which option you choose, having reliable connectivity will enhance your Bali experience immeasurably.
I am a passionate traveler, city explorer, and digital publisher focused on documenting real journeys, local cultures, and everyday travel experiences across India and beyond. Through my platforms, I share practical travel guides, city blogs, and daily travel logs that help readers explore destinations with confidence and local insight.
I am the creator of HolidayLandmark, a travel-focused ecosystem covering destinations, stories, and experiences through blogs, social platforms, and curated travel content:
- Instagram – HolidayLandmark
- Facebook – HolidayLandmark
- YouTube – HolidayLandmark
- LinkedIn – HolidayLandmark
- X (Twitter) – HolidayLandmark
- HolidayLandmark on Blogger
- HolidayLandmark on WordPress
- HolidayLandmark Stories
Alongside HolidayLandmark, I manage multiple city-focused travel portals where I publish daily travel logs and in-depth city blogs covering local attractions, food, culture, and real traveler experiences:
City Daily Travel Logs
- Bangalore Orbit – Daily Logs
- Bhopal Orbit – Daily Logs
- Chennai Orbit – Daily Logs
- Gujarat Orbit – Daily Logs
- Kerala Orbit – Daily Logs
- Mera Apna Bihar – Daily Logs
- Mumbai Orbit – Daily Logs
City Blogs & Travel Guides
- Bangalore Orbit – Blog
- Bhopal Orbit – Blog
- Chennai Orbit – Blog
- Gujarat Orbit – Blog
- Kerala Orbit – Blog
- Mera Apna Bihar – Blog
- Mumbai Orbit – Blog
Through these platforms, my goal is to create a connected travel network that offers reliable city information, real-time travel experiences, and practical guidance for travelers, explorers, and local enthusiasts.