Find the Best Cosmetic Hospitals — Choose with Confidence
Discover top cosmetic hospitals in one place and take the next step toward the look you’ve been dreaming of.
“Your confidence is your power — invest in yourself, and let your best self shine.”
Compare • Shortlist • Decide smarter — works great on mobile too.
1. Introduction
- Overview of Amarnath and its significance
- Importance in Hindu mythology (Shiva Lingam, Amarnath Yatra)
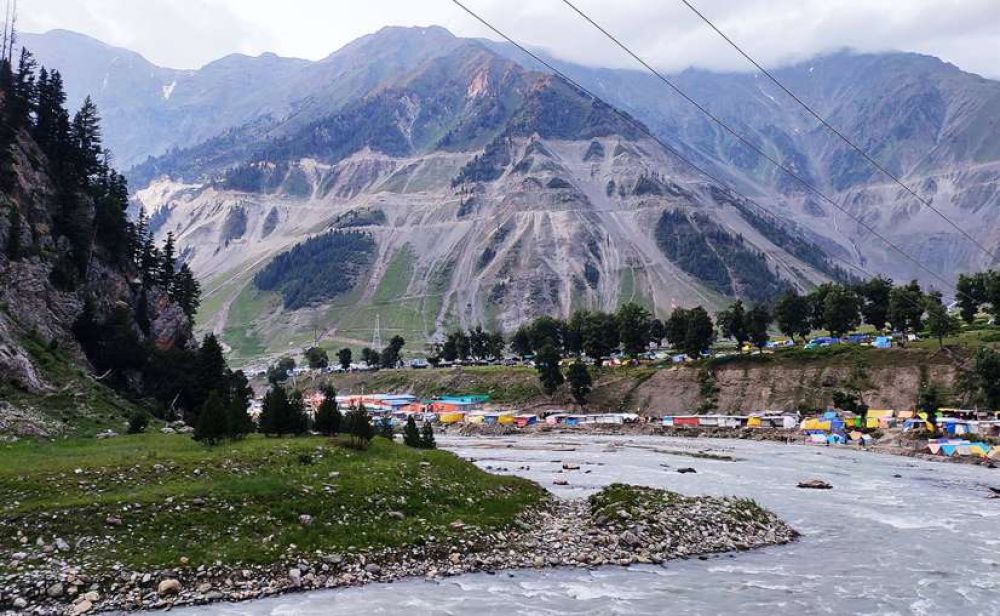
- The spiritual and scenic beauty of the region
- Duration and best season for the Amarnath Yatra

1. Overview of Amarnath and Its Significance
Amarnath is a holy shrine located in the state of Jammu and Kashmir, India, in the picturesque region of the Himalayas. The Amarnath Cave is known for housing the naturally occurring ice Shivlingam, which attracts millions of devotees every year. The cave and the surrounding region are considered sacred to Hindus, especially in the context of Lord Shiva.
The Amarnath Cave:
- Situated at an altitude of 3,888 meters (12,756 feet) above sea level, the cave is located in the Pahalgam area, about 45 kilometers from the town of Srinagar.
- The cave is famous for the Shiva Lingam, a large stalagmite formation that appears naturally every year, growing from the floor of the cave, symbolizing the Lord Shiva’s presence.
2. Importance in Hindu Mythology
The Amarnath Cave holds immense importance in Hindu mythology, as it is believed to be the site where Lord Shiva revealed the secret of immortality (Amrit) to his consort, Goddess Parvati. The sacredness of the shrine is largely attributed to this story, which has been passed down through generations.
Key Mythological Aspects:
- The Legend of Amarnath: According to Hindu mythology, Lord Shiva and Parvati traveled to the Amarnath cave to meditate in solitude. During their stay, Lord Shiva revealed the secret of immortality (Amrit) to Parvati. However, a pair of white pigeons is said to have overheard this secret and attained immortality. These pigeons are revered, and it is believed that they still live in the region today.
- Shiva Lingam: The formation of the ice Shiva Lingam inside the Amarnath Cave is considered a divine representation of Lord Shiva. Devotees believe that the Lingam grows and shrinks with the phases of the moon, making the pilgrimage an important annual event.
3. The Spiritual and Scenic Beauty of the Region
Amarnath is not only significant for its religious importance but also for its breathtaking natural beauty. The route leading to the shrine is surrounded by snow-capped mountains, verdant valleys, and lush green meadows, providing an otherworldly experience for devotees and trekkers alike.
Scenic Features:
- The Yatra Route: The Amarnath Yatra, the pilgrimage to the cave, passes through some of the most scenic and challenging landscapes in India, including forests, rivers, and glaciers.
- Views of the Himalayan Peaks: Pilgrims and travelers enjoy stunning views of snow-clad peaks, pristine rivers, and glaciers while on their journey to the cave.
- The Amarnath Glacier: The glacier itself is a breathtaking sight, particularly during the summer months when the snow begins to melt, exposing hidden landscapes.
4. Duration and Best Season for the Amarnath Yatra
The Amarnath Yatra is a highly anticipated event, attracting thousands of devotees every year. The yatra typically takes place during the summer months, with the duration and best season being influenced by weather and the lunar calendar.
Duration:
- The yatra generally lasts for around 40 days during the summer months, usually starting in late June and concluding in August, coinciding with the Shravan month of the Hindu calendar.
- The duration can vary depending on weather conditions and the government’s regulation of the pilgrimage.
Best Season:
- The best season for the Amarnath Yatra is from June to August, as the shrine remains accessible during these months. The ice Shiva Lingam reaches its full size in the middle of the summer, making it the most significant time for devotees to visit.
- Due to the rugged terrain and unpredictable weather conditions in the Himalayas, the pilgrimage route is closed during the winter months (from September to May) and reopens for a limited period in the summer.
Key Considerations:
- Pilgrims should plan their trip well in advance as the yatra requires physical endurance and involves high-altitude trekking.
- The yatra is often crowded, so organizing permits and making necessary arrangements is crucial for a safe and meaningful experience.
2. History and Significance
- Mythological origins of Amarnath Cave
- Discovery and spiritual relevance
- Significance of the natural ice Shivling formation
1. Mythological Origins of Amarnath Cave
The legend of Amarnath Cave is deeply rooted in Hindu mythology, which says that Lord Shiva chose this cave as a place to reveal the secrets of immortality to his consort, Goddess Parvati. The cave is said to be situated in the snow-clad mountains of the Himalayas, far away from civilization.
The Legend:
- According to the myth, Lord Shiva wanted to share the secret of immortality (Amaratva) with Parvati. He chose a secluded spot in the mountains to avoid being overheard by anyone.
- To ensure no one would disturb them, he asked his vehicle, Nandi (the bull), to wait outside the cave, and instructed the five elements (earth, water, fire, air, and space) to guard the entrance.
- The story continues that as Shiva and Parvati meditated in the cave, a pair of pigeons (representing immortality) were born from the secret and overheard the conversation, thus learning the secret of immortality.
- It is believed that these pigeons can still be seen around the cave, marking the divine connection.
2. Discovery and Spiritual Relevance
The Amarnath Cave itself has been known to locals and pilgrims for centuries, but its discovery by wider society is often credited to a Muslim shepherd named Buta Malik in the 15th century.
Buta Malik’s Discovery:
- The legend states that Buta Malik, a shepherd, once wandered into the mountains while tending to his flock. He encountered an old sage who gave him a bag filled with coal. When he returned home, he opened the bag, only to find it full of gold coins instead of coal.
- Following this miraculous event, Buta Malik was guided by the sage to the cave. Upon discovering the cave, he realized its immense religious significance, and word soon spread about the sacred site.
Spiritual Significance:
- The cave has become a pilgrimage site for Hindus, with thousands of devotees traveling to the shrine during the annual Amarnath Yatra.
- The journey itself is considered to be a spiritual test, and it is said that those who undertake the yatra are blessed with the knowledge of immortality and the grace of Lord Shiva.
- The pilgrimage typically occurs in the summer months when the weather conditions are relatively manageable, and it lasts for about two months.
3. Significance of the Natural Ice Shivling Formation
One of the most awe-inspiring aspects of the Amarnath Cave is the natural ice Shivling that forms within the cave. This formation is considered to be a manifestation of Lord Shiva himself.
The Formation:
- The Shivling inside the cave is formed naturally by the freezing of water that drips from the cave’s ceiling. The ice grows in size over the months and is known to reach its peak size during the full moon of Shravan (July-August).
- Devotees believe that the Shivling represents Lord Shiva and worship it as such. The formation of the Shivling is seen as a divine miracle, and its appearance is considered sacred and auspicious.
Scientific Explanation:
- The Shivling’s formation is due to the freezing of water that seeps from the mountain above and falls into the cave, where the temperature remains cool enough for the water to freeze. This natural phenomenon has fascinated both religious and scientific communities.
- The ice formation is not consistent every year, as the size of the Shivling can vary depending on the weather conditions, but its miraculous appearance is always met with reverence.
3. How to Reach Amarnath
| Mode of Transport | Details | Estimated Time |
|---|---|---|
| By Air | Srinagar Airport (nearest airport) | 2-hour road journey to Baltal or Pahalgam |
| By Train | Jammu Tawi (nearest railway station) | 12-hour road journey to Baltal or Pahalgam |
| By Road | Well-connected by bus or taxi | Depends on starting location |
Major Routes to Amarnath Cave
- Baltal Route (shorter but more challenging, 14 km trek)
- Pahalgam Route (longer but scenic, 36 km trek)
Amarnath, one of the holiest pilgrimage sites in India, is located in the Kashmir Valley at a height of 3,888 meters (12,756 feet). The cave is dedicated to Lord Shiva and is an important destination for Hindu devotees, especially during the annual Amarnath Yatra. There are several ways to reach Amarnath, including by air, train, and road. Below is a detailed breakdown of each option and the major routes leading to the Amarnath Cave.
Mode of Transport to Amarnath
1. By Air:
- Nearest Airport: Srinagar Airport (SXR)
- Details: The closest airport to Amarnath is in Srinagar, the summer capital of Jammu and Kashmir. You can fly to Srinagar from major cities like Delhi, Mumbai, and Chandigarh. From Srinagar, you can travel to the base camps of Amarnath – Baltal or Pahalgam – by road.
- Estimated Time:
- From Srinagar Airport to Baltal: 2-hour road journey.
- From Srinagar Airport to Pahalgam: Approximately 2-3 hours by road.
- Transportation Options: Taxis or private vehicles are available from Srinagar to the base camps.
2. By Train:
- Nearest Railway Station: Jammu Tawi
- Details: The nearest railway station to Amarnath is Jammu Tawi, which is well connected to major cities across India. After arriving at Jammu Tawi, you will need to continue your journey by road.
- Estimated Time:
- From Jammu Tawi to Baltal or Pahalgam: A 12-hour road journey.
- Transportation Options: Buses, taxis, or private vehicles are available to take pilgrims to the base camps.
3. By Road:
- Well-Connected by Bus or Taxi:
- Details: Amarnath is well connected by road from major cities like Jammu, Srinagar, and Delhi. There are buses and taxis available for the journey. If you are traveling by bus, you can reach Jammu or Srinagar first and then proceed to Baltal or Pahalgam.
- Estimated Time:
- Depends on the starting location, but it usually takes around 12 hours to travel from Jammu to Amarnath.
Major Routes to Amarnath Cave
There are two main trekking routes to the Amarnath Cave – the Baltal Route and the Pahalgam Route. Both routes offer different experiences in terms of distance, challenge, and scenic beauty.
1. Baltal Route
- Distance: 14 km trek
- Details: The Baltal route is the shorter of the two, but it is also considered more challenging due to its steep terrain. The trek is generally completed in one day and is more suited for those who are physically fit and prefer a quicker pilgrimage.
- Difficulty: Moderate to challenging, with steep climbs.
- Key Points:
- Starts at Baltal Base Camp.
- Passes through rugged terrain and high-altitude paths.
- The trek takes around 6-8 hours for most pilgrims.
- Pilgrims can opt for helicopter services between Baltal and the cave if they wish to avoid the trek.
2. Pahalgam Route
- Distance: 36 km trek
- Details: The Pahalgam route is longer but considered more scenic and less steep than the Baltal route. It is ideal for pilgrims who want a more relaxed and picturesque experience. This route takes around 3 days to complete, with overnight stays at camps along the way.
- Difficulty: Easy to moderate, with gradual ascents.
- Key Points:
- Starts from Pahalgam Base Camp.
- Passes through lush green meadows, forests, and rivers.
- It is a more scenic and spiritual journey, with several rest stops along the way.
- The trek takes around 3 days, with overnight halts at places like Chandanwari, Sheshnag, and Panchtarni.
- Pilgrims can also opt for pony rides or palanquins on this route for part of the journey.
Other Important Information
- Helicopter Services:
- Helicopter services are available from both Baltal and Pahalgam to Amarnath Cave for those who prefer not to trek. Helicopter tickets must be booked in advance as they are in high demand during the pilgrimage season.
- Cost: The cost of the helicopter ride varies, and it is typically around INR 1,500–3,000 (one way) from Baltal or Pahalgam.
- Best Time to Visit:
- The Amarnath Yatra is usually conducted during the summer months, from June to August, when the weather is more favorable. The yatra duration depends on the weather conditions and the availability of facilities.
- Permit:
- Pilgrims are required to obtain a permit to undertake the Amarnath Yatra. The registration process is done online or at designated registration centers.
- Accommodation:
- There are numerous tents, camps, and temporary shelters along both routes. However, it’s best to make arrangements in advance, especially if you’re traveling during the peak season.
4. Best Time to Visit
| Month | Weather Condition | Recommended Activities |
|---|---|---|
| July to August | Cool, minimal snowfall | Ideal for Yatra, spiritual activities |
| September | Off-season | Trekking, sightseeing, and exploring |
1. July to August: Cool, Minimal Snowfall
- Weather Condition:
- During July and August, the weather is generally cool, and there is minimal snowfall in many regions that are popular for yatra (pilgrimage) or other outdoor activities.
- These months often provide a serene and pleasant atmosphere for visitors, making it ideal for those seeking peace and a spiritual experience.
- Recommended Activities:
- Yatra (Pilgrimage): This period is perfect for religious or spiritual journeys, as the cool weather and minimal snowfall make trekking to sacred sites more manageable.
- Spiritual Activities: Many people prefer visiting temples or meditation centers during this time due to the calm weather. It’s a time for introspection and participation in spiritual rituals.
- Nature Walks: The cool, crisp air and scenic views enhance the experience of nature walks or visiting spiritual retreats.
- Important Notes:
- As this is a popular time for pilgrimages, ensure to book accommodations in advance.
- Crowds can be heavy, so prepare for more visitors in these areas.
- Weather conditions can vary depending on the altitude, so it’s advisable to check the specific forecast for the area you are visiting.
2. September: Off-Season
- Weather Condition:
- September marks the off-season for many tourist destinations. The weather is still pleasant, but temperatures begin to rise as the monsoon season transitions into autumn.
- There is a chance of occasional rain, but the intensity of rainfall decreases compared to the summer months. The skies are often clear, and the weather is comfortable for outdoor activities.
- Recommended Activities:
- Trekking: September is a great time for trekking and hiking since the trails are less crowded, and the views are stunning after the rains. The landscapes are lush, and many trekking paths are accessible.
- Sightseeing: The off-season means fewer tourists, so you can enjoy sightseeing without the hustle and bustle. Exploring temples, mountains, valleys, and other local attractions is much more peaceful.
- Exploring the Area: With fewer tourists, you can engage in deeper exploration of local culture, cuisine, and customs. This is a good time to visit rural areas or places that may be overly crowded during peak season.
- Important Notes:
- As September is off-season, some services or attractions might be closed or have reduced hours, so it’s essential to plan ahead.
- It’s easier to find deals on accommodation and transportation during the off-season.
- The weather can still be unpredictable, so carry suitable clothing and gear for occasional rain or sudden weather changes.
5. Trekking Routes and Difficulty Levels
Baltal Route
- Distance: 14 km (one way)
- Trekking Time: 1-2 days
- Difficulty: Moderate to Difficult
- Description: A steep and narrow trek, preferred for a quick journey.
Pahalgam Route
- Distance: 36 km (one way)
- Trekking Time: 3-5 days
- Difficulty: Moderate
- Description: Scenic route passing through Chandanwari, Sheshnag, and Panchtarni.
1. Baltal Route
- Distance: 14 km (one way)
- Trekking Time: 1-2 days
- Difficulty: Moderate to Difficult
- Route Description:
- Starting Point: Baltal Base Camp
- Ending Point: Amarnath Cave
- Route Overview:
- The Baltal route is one of the most popular and preferred options for trekkers who are looking to complete the journey quickly.
- The route is shorter compared to the Pahalgam route but is steeper and more challenging.
- This route is generally considered more difficult due to its rugged terrain and narrow paths, requiring trekkers to have good stamina and a higher level of fitness.
- It involves a steep climb that can be challenging for beginners, but experienced trekkers often prefer it to complete the trek faster.
- Highlights:
- The trek offers stunning views of the Himalayan landscape.
- It is a more direct route to the Amarnath Cave.
- Because of its relatively shorter distance, trekkers can do the trek in 1-2 days.
- Challenges:
- The steep incline and narrow path can make it physically demanding.
- Weather conditions can make it tough, with cold winds and unpredictable rain.
- Since it is a high-altitude trek, altitude sickness can be a risk.
- Recommendation:
- Best suited for seasoned trekkers with a good level of physical fitness.
- Should be well-prepared with proper gear, especially for cold and rocky conditions.
2. Pahalgam Route
- Distance: 36 km (one way)
- Trekking Time: 3-5 days
- Difficulty: Moderate
- Route Description:
- Starting Point: Pahalgam Base Camp
- Ending Point: Amarnath Cave
- Route Overview:
- The Pahalgam route is the traditional and more scenic trekking path to the Amarnath Cave.
- This longer route covers a distance of 36 km one way and usually takes trekkers 3-5 days to complete, depending on pace and resting points.
- The trek passes through lush meadows, alpine forests, and picturesque landscapes, offering a more gradual climb compared to the Baltal route.
- Highlights:
- The trek passes through several beautiful spots like Chandanwari, Sheshnag, and Panchtarni, which offer breathtaking views of the surrounding peaks, valleys, and pristine lakes.
- This route is less challenging in terms of terrain, with moderate inclines and flatter sections.
- More time can be taken for rest, providing a leisurely pace for trekkers.
- Challenges:
- The trek is longer, so it requires a longer duration of physical endurance.
- Due to the prolonged trekking days, altitude sickness is still a risk, though less intense than on the Baltal route.
- Weather can be unpredictable, and trekkers should be prepared for sudden weather changes, particularly in the high-altitude areas.
- Recommendation:
- Ideal for those who prefer a more scenic and gradual trek.
- A great option for trekkers who want to take their time and experience the full journey to Amarnath Cave.
- Suitable for trekkers with a moderate fitness level.

Comparison Summary:
| Route | Distance | Trekking Time | Difficulty Level | Key Features | Best Suited For |
|---|---|---|---|---|---|
| Baltal Route | 14 km | 1-2 days | Moderate to Difficult | Steep climb, narrow path, quicker trek, rugged terrain. | Experienced trekkers, those short on time. |
| Pahalgam Route | 36 km | 3-5 days | Moderate | Scenic journey through meadows and forests, gradual incline. | Trekkers seeking a scenic and leisurely experience. |
Additional Tips for Both Routes:
- Weather Conditions: The weather can change rapidly in the Amarnath region. It is advisable to carry warm clothing, rain gear, and sun protection.
- Altitude: Both routes reach altitudes above 3,500 meters, so acclimatization is essential to avoid altitude sickness.
- Packing Tips: Carry a light backpack, enough food and water, a sleeping bag, trekking poles, and suitable footwear.
- Health Considerations: Ensure you’re physically prepared for the trek. It’s advised to consult a doctor before embarking, especially for those with pre-existing conditions or those unfamiliar with high-altitude trekking.
6. Registration and Permits
- Process for online registration
- Compulsory health certificate
- Permit details and documents required
- Fees and deadlines
1. Process for Online Registration
Step 1: Access the Registration Portal
- Visit the official online registration website of the relevant authority (e.g., health department, government portal, etc.).
- Ensure that you have a stable internet connection.
Step 2: Create an Account (if needed)
- If it’s your first time registering, you may need to create a user account by providing basic information like name, email address, and phone number.
- Some platforms might require you to create a username and password for future logins.
Step 3: Fill Out the Registration Form
- After logging in, navigate to the online registration form.
- Provide all necessary details such as personal information, address, occupation, and contact information.
- Depending on the nature of the registration, you may need to fill out additional details like purpose of registration, type of service, or other specifics.
Step 4: Upload Required Documents
- Scan and upload relevant documents (e.g., identity proof, proof of address, educational qualifications, etc.).
- Make sure the documents are clear, legible, and meet the size/format requirements set by the registration platform.
Step 5: Submit the Registration Form
- After filling out the form and uploading documents, review everything to ensure accuracy.
- Submit the registration form for processing.
Step 6: Acknowledge Receipt and Payment
- Once your application is submitted, you may receive an acknowledgment receipt via email or on the portal.
- If there are any fees, you will be directed to an online payment page.
- Ensure payment is made within the specified timeline to avoid any issues with your registration.
Step 7: Confirmation and Processing
- After submitting, your registration will be reviewed by the relevant authorities.
- You may receive an email or notification regarding the status of your registration (approval, pending documents, etc.).
Step 8: Print Registration Details
- After approval, you can print your registration confirmation or permit, if required.
2. Compulsory Health Certificate
Step 1: Schedule an Appointment
- If the health certificate is a requirement, schedule an appointment with an authorized health practitioner or medical facility.
- You may need to check the online registration portal for details on approved clinics or hospitals.
Step 2: Provide Medical History and Information
- At the medical examination, provide your personal medical history and undergo any necessary tests (e.g., blood tests, x-rays, etc.).
- The doctor may inquire about your lifestyle, medical conditions, allergies, or medications.
Step 3: Health Examination
- The doctor will perform the required medical examination.
- Based on your health status, the certificate will be issued if you meet the required standards.
Step 4: Obtain the Certificate
- After the health checkup, you will be provided with the health certificate.
- Ensure the certificate includes all relevant details like the doctor’s stamp, signature, date, and test results.
Step 5: Upload or Submit the Certificate
- Upload the health certificate online to complete the registration process, or submit it physically if required by the authority.
3. Permit Details and Documents Required
Step 1: Identify the Permit Required
- Determine which specific permit you are applying for (e.g., business permit, event permit, travel permit, etc.).
- Review the permit requirements on the official portal or contact the authorities for guidance.
Step 2: Prepare Required Documents
- Typical documents required for permits may include:
- Proof of identity (Passport, Aadhar card, etc.)
- Proof of address (Utility bill, rental agreement, etc.)
- Proof of health status (Health certificate, medical history)
- Business-related documents (Business registration, financial documents)
- Special permits or clearance certificates (e.g., environmental clearance, safety certificates)
Step 3: Submit Documents
- Upload or submit the required documents as specified by the permit-issuing authority.
- Ensure documents are in the correct format and size as per the guidelines.
Step 4: Pay Fees (if applicable)
- Some permits may require you to pay a processing fee.
- Follow the instructions to make an online payment or submit the fee in the specified manner (bank transfer, in-person payment, etc.).
Step 5: Wait for Approval
- After submission, the authorities will process the application and verify the documents.
- Depending on the type of permit, approval times can vary from a few days to weeks.
Step 6: Receive Permit
- Once approved, the permit will be issued.
- You may be able to download it directly from the portal or receive it via mail, depending on the service.
4. Fees and Deadlines
Step 1: Fee Structure
- The fees for registration and permits can vary widely depending on the type of application.
- Check the fee schedule on the official website before applying to ensure you’re aware of the costs.
Step 2: Payment Methods
- Most portals offer a variety of payment methods, including online banking, credit/debit cards, UPI, or offline options like bank drafts or cash.
- Ensure you follow the specific instructions for your payment.
Step 3: Deadlines for Submission
- Pay attention to any deadlines for submission of the registration form, health certificate, documents, and permit application.
- Missing the deadline could result in penalties or the rejection of your application.
Step 4: Follow-up Reminders
- Some platforms send reminders for upcoming deadlines, so ensure your contact information is up to date.
- Keep track of important deadlines to avoid late submissions and delays.
7. Accommodation Options
| Location | Accommodation Type | Estimated Cost per Night |
|---|---|---|
| Pahalgam | Hotels, guesthouses | ₹1,500 – ₹5,000 |
| Baltal | Tents, campsites | ₹500 – ₹2,000 |
| Srinagar | Hotels, houseboats | ₹2,000 – ₹10,000 |
1. Pahalgam
Accommodation Type:
- Hotels: Pahalgam, known for its serene landscapes, offers a variety of hotels ranging from budget to luxury. The facilities provided include comfortable rooms, on-site restaurants, and scenic views.
- Guesthouses: These are often more affordable options, providing a homely environment with basic amenities. Ideal for travelers seeking a more private and quiet experience.
Estimated Cost per Night:
- ₹1,500 – ₹5,000 depending on the type of accommodation, with budget-friendly options on the lower end and more luxurious choices on the higher end. The cost can vary based on the time of year, with peak season being more expensive.
What to Expect:
- Basic Amenities: Clean rooms, attached bathrooms, Wi-Fi (sometimes), and daily meals.
- Scenic Views: Most accommodations offer great views of the surrounding mountains and rivers.
- Nearby Attractions: Close to Aru Valley, Betaab Valley, and the Lidder River, ideal for sightseeing and adventure activities.
2. Baltal
Accommodation Type:
- Tents: Baltal is a popular base camp for pilgrims visiting Amarnath Shrine, and during the peak season, it’s filled with tents. These tents are often basic and cater to large groups of people.
- Campsites: These offer a more comfortable option compared to tents, with additional amenities like bedding, camp chairs, and sometimes even heaters, depending on the weather.
Estimated Cost per Night:
- ₹500 – ₹2,000, depending on whether you opt for simple tents or more luxurious campsite options. The cost is lower than in Pahalgam as the area mainly caters to pilgrims and backpackers.
What to Expect:
- Basic Amenities: Most accommodations provide only the essentials such as a bed, sleeping bag, and shared washrooms.
- Temporary Structures: Accommodations here are seasonal, and during the pilgrimage season, they are set up specifically for devotees.
- Proximity to Amarnath Cave: Being close to the base camp, Baltal offers convenience for those intending to visit the Amarnath Shrine.
3. Srinagar
Accommodation Type:
- Hotels: Srinagar offers a wide range of hotels, from budget to luxury, including well-maintained properties. These hotels often include basic services such as room service, Wi-Fi, and restaurants.
- Houseboats: A unique feature of Srinagar, houseboats offer a charming and memorable stay. Floating on Dal Lake, these houseboats provide a cozy and romantic setting, with full facilities like restaurants and private bathrooms.
Estimated Cost per Night:
- ₹2,000 – ₹10,000 depending on the type of accommodation. Budget hotels are on the lower end of the spectrum, while luxury houseboats and upscale hotels are priced higher.
What to Expect:
- Luxury and Comfort: Hotels and houseboats in Srinagar provide a higher level of comfort, with air-conditioning, heating (important in winter), and other premium services.
- Cultural Experience: Staying in a houseboat is an unforgettable experience, offering a glimpse into Kashmiri culture, with intricately designed interiors and scenic views of Dal Lake.
- Access to Attractions: Srinagar is home to famous spots like Mughal Gardens, Dal Lake, Nishat Bagh, and Shankaracharya Hill, making it a great base for sightseeing.
Additional Considerations for All Locations:
- Booking in Advance: It’s recommended to book your stay in advance, especially during peak seasons like summer and the Amarnath Yatra period, to ensure availability.
- Facilities: While Pahalgam and Srinagar tend to offer more varied and higher-end accommodations, Baltal has limited amenities, catering primarily to pilgrims.
- Local Culture: Kashmiri hospitality is warm and welcoming, especially in the local guesthouses and houseboats, providing travelers a chance to experience the region’s rich cultural heritage.
8. What to Pack
- Essentials for trekking: warm clothes, rain gear, trekking shoes
- First-aid kit, snacks, and water bottles
- Identity proof, permits, and cash
- Camera and power banks
1. Essentials for Trekking
- Warm Clothes:
Weather can be unpredictable in trekking areas, so it’s important to bring clothes that keep you warm, especially in higher altitudes. Pack:- Base layers (moisture-wicking)
- Insulated jacket or fleece
- Gloves, hat, and scarf
- Extra warm layers for the evenings and mornings
- Rain Gear:
Trekking in the rain can be challenging, so having waterproof clothing is essential. Make sure to pack:- Waterproof jacket (preferably breathable)
- Waterproof pants or poncho
- Waterproof boots or gaiters for wet conditions
- Trekking Shoes:
Comfortable and durable trekking shoes are a must for long hikes. Choose shoes that:- Provide good ankle support
- Are waterproof or quick-drying
- Have sturdy soles for grip on rocky or slippery terrain
- Are broken in to avoid blisters
2. First-Aid Kit, Snacks, and Water Bottles
- First-Aid Kit:
Having a first-aid kit is essential for handling minor injuries. Some basics to include are:- Band-aids, gauze, and antiseptic
- Pain relievers (like ibuprofen)
- Tweezers for splinters or ticks
- Blister pads
- Any personal medications (e.g., inhalers, epinephrine)
- Antihistamines for allergies
- A small surgical tape and scissors
- Snacks:
Quick energy sources are important for maintaining your energy levels. Consider packing:- Energy bars or protein bars
- Trail mix (nuts, dried fruit, and chocolate)
- Fresh fruit (like apples or oranges)
- Electrolyte tablets or powder for hydration
- Water Bottles:
Staying hydrated is key. Carry enough water to last between refill points.- Hydration systems like a Camelbak or large water bottles
- A water filter or purification tablets for longer treks
3. Identity Proof, Permits, and Cash
- Identity Proof:
Carry a valid ID with you (passport, Aadhar card, or driver’s license). This is often required for entry into national parks or remote areas. - Permits:
Some trekking areas require permits, either from the local government or park authorities. Ensure:- You have the necessary permits before you start trekking
- Any special permits for specific areas (e.g., trekking in protected zones)
- Cash:
Many trekking areas, especially remote ones, may not have ATMs. Carry enough cash for:- Entry fees
- Guide or porter services (if required)
- Local purchases (snacks, souvenirs)
4. Camera and Power Banks
- Camera:
Trekking offers stunning landscapes that you’ll want to capture. Bring a camera or a smartphone with a good camera to take photos of:- Scenic views, wildlife, and unique moments during the trek
- A compact, durable camera or smartphone is usually enough
- Power Banks:
Charging options can be limited on trekking trips, especially in remote areas. Carry power banks to:- Keep your phone or camera charged
- Make sure to bring a high-capacity power bank (10,000mAh or more) for extended treks
- Consider solar chargers if you’re trekking for several days
5. Other Important Items
- Sunscreen & Lip Balm:
Protect your skin from the sun, especially at higher altitudes where UV exposure increases. Pack:- A high SPF sunscreen (SPF 30 or higher)
- Lip balm with SPF to protect your lips from chapping
- Headlamp/Flashlight:
A headlamp is essential for early morning or late evening treks. Don’t forget extra batteries! - Trekking Poles:
Useful for balancing and reducing strain on knees, especially on steep climbs or descents. - Multi-tool/Knife:
A compact tool that can be used for various purposes, such as cutting, opening, or minor repairs.
6. Special Considerations
- Weather-Specific Gear:
Depending on your trek, consider adding:- Gaiters for snow or mud protection
- A beanie or buff for extreme cold conditions
- Sunglasses for eye protection against UV rays
- Trekking Map/Compass:
Even if you’re trekking with a guide, it’s helpful to have a map and compass or GPS device as a backup.
9. Safety Tips
- Acclimatization and dealing with high altitude
- Emergency helplines
- Avoiding overexertion
- Following the Yatra guidelines and staying with groups
1. Acclimatization and Dealing with High Altitude
High-altitude treks or pilgrimages, especially those above 8,000 feet, require proper acclimatization to prevent altitude sickness, which occurs when the body struggles to adjust to lower oxygen levels at higher elevations.
Step-by-Step:
- Gradual Ascent: Ascend gradually to give your body time to adjust. For every 3,000-4,000 feet of altitude, take a day to rest and acclimatize.
- Hydrate Well: Drink plenty of water to stay hydrated. Dehydration can exacerbate symptoms of altitude sickness.
- Take it Slow: Avoid rushing or overexerting yourself. Moving too fast increases the risk of altitude sickness.
- Eat Light and Regularly: Eat light meals that are easy to digest. Foods rich in carbohydrates are ideal as they provide energy at high altitudes.
- Monitor Symptoms: Watch for signs of altitude sickness, including headache, nausea, dizziness, and shortness of breath. If symptoms worsen, descend immediately to a lower altitude.
2. Emergency Helplines
Before embarking on a high-altitude yatra, it’s crucial to have access to emergency contacts and resources in case of medical issues or accidents.
Step-by-Step:
- Identify Local Helplines: Ensure you have the contact numbers of local emergency services such as police, ambulance, and medical centers in the region where you are trekking.
- Know Rescue Services: Familiarize yourself with helicopter rescue services if available in the area. Helicopter evacuation is often the quickest way to get help in remote areas.
- Carry Satellite Phone: In areas with poor mobile network coverage, carrying a satellite phone can be a lifesaver for emergency communication.
- Inform Someone About Your Plans: Share your itinerary and travel plans with a trusted person back home so they can assist if needed.
3. Avoiding Overexertion
High-altitude environments require that you take extra care not to overexert yourself, as this can lead to fatigue, dehydration, and increased risk of altitude sickness.
Step-by-Step:
- Listen to Your Body: Take breaks as needed and do not push your limits. Rest is vital for recovery, especially when walking uphill or tackling steep terrain.
- Pace Yourself: Keep a steady, manageable pace. It’s better to be slower but consistent than to rush and tire out early.
- Avoid Heavy Loads: Do not carry unnecessary weight. If possible, hire porters or use pack animals to carry your supplies, so you don’t strain yourself.
- Take Regular Rest Breaks: Every hour of walking should be followed by a short break of 5-10 minutes to give your body time to recover.
- Know When to Stop: If you’re feeling lightheaded, short of breath, or excessively fatigued, stop and rest. Never ignore warning signs from your body.
4. Following the Yatra Guidelines and Staying with Groups
Staying within the guidelines set by the yatra organizers and traveling with a group enhances safety and ensures you are following best practices for the journey.
Step-by-Step:
- Understand the Guidelines: Each yatra will have its own set of guidelines for safety, conduct, and medical procedures. Make sure you read and understand these guidelines thoroughly.
- Stick to Designated Routes: Do not deviate from the prescribed route. Going off the trail can lead to accidents or getting lost.
- Travel in Groups: Always stay with the group or guide, as it provides mutual support and safety. In case of any issues, such as health problems or accidents, immediate help will be available.
- Inform Guides About Health Issues: If you have any pre-existing medical conditions or if you feel unwell during the yatra, inform your guide immediately.
- Respect Local Customs: High-altitude yatras often pass through sacred or culturally significant sites. Respect the local traditions and customs to avoid misunderstandings or conflicts.
Additional Tips:
- Weather Preparedness: High-altitude environments can change rapidly. Always carry appropriate clothing for cold, rain, or snow.
- First Aid Kit: Carry a basic first aid kit with items like pain relievers, bandages, antiseptic creams, and altitude sickness medication.
- Stay Informed: Keep up to date on weather forecasts and any changes in yatra schedules or routes.
- Emergency Evacuation Plan: Always know how you will get off the mountain in case of an emergency. If you’re on a high-altitude trek, have a plan in place for evacuation or assistance.
10. Things to Do
| Activity | Location | Description |
|---|---|---|
| Visit Amarnath Cave | Amarnath | Witness the natural ice Shivling |
| Sightseeing in Pahalgam | Pahalgam | Enjoy scenic valleys and Lidder River |
| Houseboat Stay | Srinagar | Experience the famous Dal Lake |
| Explore Sheshnag Lake | On Pahalgam Route | Beautiful high-altitude lake |
1. Visit Amarnath Cave
Location: Amarnath, Jammu & Kashmir
Description:
- Purpose: Amarnath Cave is famous for the natural ice Shivling, which is a revered Hindu shrine dedicated to Lord Shiva. This sacred site attracts thousands of pilgrims every year during the Amarnath Yatra (annual pilgrimage).
- How to Reach: The cave is located at an altitude of 3,888 meters. Pilgrims usually begin their journey from either Pahalgam or Baltal, which are the base camps. A trekking route or a helicopter ride can take you closer to the cave.
- Best Time to Visit: The pilgrimage season generally runs from late June to August, when the ice Shivling is formed.
- Things to Do:
- Offer prayers at the Amarnath Cave temple.
- Witness the natural ice Shivling, a stunning formation of ice that resembles the shape of Lord Shiva.
- Explore nearby caves and temples associated with the pilgrimage route.
2. Sightseeing in Pahalgam
Location: Pahalgam, Jammu & Kashmir
Description:
- Purpose: Pahalgam is a serene and picturesque hill station located at the confluence of the Lidder and Aru rivers. It is a popular base for Amarnath pilgrims but also a tourist hotspot.
- How to Reach: Pahalgam is 95 kilometers from Srinagar and can be reached by road via a well-maintained highway.
- Best Time to Visit: March to September is ideal for sightseeing, with pleasant weather. Winters (November to February) bring snow, making it a great time for snow sports.
- Things to Do:
- Enjoy scenic views of lush green valleys, snow-capped mountains, and river streams.
- Trek to Baisaran Valley, a hidden gem offering panoramic views of Pahalgam.
- Visit the ancient Mamleshwar Temple, located in the heart of the town.
- Explore the famous Lidder River for trout fishing and river rafting.
- Take a pony ride to nearby areas like Betab Valley.
3. Houseboat Stay
Location: Srinagar, Jammu & Kashmir
Description:
- Purpose: Staying on a traditional houseboat on the Dal Lake is a one-of-a-kind experience in Srinagar. The houseboats are luxurious and offer a beautiful view of the lake and surrounding landscapes.
- How to Reach: Houseboats are available on Dal Lake in Srinagar. You can book your stay through various travel agencies or directly from houseboat owners.
- Best Time to Visit: Summer (May to September) is perfect for houseboat stays, as the weather is mild and pleasant.
- Things to Do:
- Stay in a well-decorated houseboat with traditional Kashmiri wooden interiors.
- Take a Shikara (wooden boat) ride on Dal Lake to explore floating gardens and markets.
- Experience the beauty of lotus flowers blooming in the lake during summer.
- Enjoy Kashmiri cuisine on the houseboat, including Rogan Josh, Dum Aloo, and traditional Kahwa.
4. Explore Sheshnag Lake
Location: On the Pahalgam Route, Jammu & Kashmir
Description:
- Purpose: Sheshnag Lake is a stunning high-altitude lake situated on the Amarnath Yatra route. It’s known for its picturesque surroundings and tranquil waters, making it an ideal spot for nature lovers and trekkers.
- How to Reach: The lake is located around 23 kilometers from Pahalgam. It is typically accessed during the Amarnath Yatra, though trekkers can visit it independently by undertaking the challenging trek from Pahalgam.
- Best Time to Visit: Summer months (June to September) are perfect for trekking, as the weather is suitable for hiking and exploring.
- Things to Do:
- Trek through the beautiful forest and lush meadows to reach Sheshnag Lake.
- Capture breathtaking views of the lake surrounded by mountains.
- Enjoy the quiet and peaceful environment, perfect for meditation or photography.
- Spend time near the lake and watch the reflections of the surrounding mountains on its surface.
11. Local Cuisine and Food
- Kashmiri dishes: Rogan Josh, Yakhni, Dum Aloo, Kahwa tea
- Availability of vegetarian food for yatris
- Local eateries and their specialties
1. Kashmiri Dishes
Kashmir has a vibrant culinary tradition, with several iconic dishes that reflect its unique cultural heritage.
a) Rogan Josh
- Description: Rogan Josh is a signature dish of Kashmiri cuisine, primarily consisting of tender lamb or goat cooked in a rich and aromatic gravy made with yogurt, onions, garlic, and a variety of spices such as Kashmiri red chili powder, turmeric, and garam masala. The dish is typically garnished with saffron or fried onions, which enhance the flavor.
- Serving: It is often served with steamed rice or flatbread like naan or sheermal.
- Key Ingredients: Lamb or goat meat, yogurt, Kashmiri red chili, saffron, garam masala, ginger.
b) Yakhni
- Description: Yakhni is a comforting and mildly spiced mutton or chicken broth-based dish. The meat is cooked in a stock made with yogurt, fennel seeds, cinnamon, and cardamom, giving it a unique and fragrant flavor. This dish is often served with rice.
- Serving: It’s typically served with plain steamed rice, as the broth is rich and flavorful.
- Key Ingredients: Mutton or chicken, yogurt, fennel seeds, cardamom, cinnamon, cloves, and ginger powder.
c) Dum Aloo
- Description: Dum Aloo is a vegetarian Kashmiri delicacy made with potatoes, cooked in a flavorful gravy made from yogurt, tomatoes, and a mixture of spices. The dish is slow-cooked (dum) to allow the potatoes to absorb all the spices and flavors.
- Serving: It’s commonly served with rice or flatbreads like roti.
- Key Ingredients: Baby potatoes, yogurt, ginger powder, fennel seeds, Kashmiri red chili, and garam masala.
d) Kahwa Tea
- Description: Kahwa is a traditional Kashmiri green tea, made with green tea leaves, saffron, almonds, cardamom, and cinnamon. It’s a refreshing and soothing drink, often served to guests and tourists, especially in the cold winter months.
- Serving: Kahwa is traditionally served hot in small cups and can be enjoyed with a sweet treat like bakarkhani (Kashmiri bread).
- Key Ingredients: Green tea leaves, saffron, almonds, cardamom, cinnamon.
2. Availability of Vegetarian Food for Yatris
For those visiting Kashmir, especially yatris (pilgrims), there is a wide range of vegetarian food options to cater to different dietary preferences. Kashmiri cuisine offers numerous vegetarian dishes that are both hearty and flavorful.
- Vegetarian Main Dishes: Dishes like Dum Aloo, Chana Dal, Rajma, and various vegetable stews (like ‘Nadru Monje’, a lotus stem dish) are commonly served to vegetarians. These dishes are prepared with aromatic spices and often feature fresh vegetables grown in the region’s fertile soil.
- Snacks and Street Food: Yatris can enjoy local snacks such as ‘Samosas’, ‘Kashmiri Baida Roti’, and ‘Bakarkhani’. These are widely available in the local markets and eateries. The vegetarian options ensure that those following specific diets have plenty of choices to explore.
- Breakfast Options: A popular breakfast dish is ‘Sheer Chai’ (a pink tea with milk), accompanied by freshly baked breads like ‘Kulcha’ or ‘Lavasa’, which are perfect for a light yet filling meal.
3. Local Eateries and Their Specialties
Kashmir has a rich food culture, and local eateries offer a diverse array of traditional dishes. Here are some notable places where yatris can enjoy authentic Kashmiri food:
a) Shamyana Restaurant
- Specialty: This well-known restaurant offers a range of traditional Kashmiri dishes, including Rogan Josh, Yakhni, and Dum Aloo. The ambiance is perfect for experiencing the essence of Kashmiri hospitality.
b) Ahdoos Restaurant
- Specialty: Known for its authentic Kashmiri cuisine, Ahdoos is famous for dishes like the Kashmiri Wazwan (a formal multi-course meal) and traditional breads like ‘Sheermal’ and ‘Kashmiri Naan’.
c) Mughal Darbar
- Specialty: As the name suggests, Mughal Darbar specializes in Mughlai and Kashmiri fusion cuisine. They are known for their tender kebabs, Rogan Josh, and the classic Kashmiri Yakhni.
d) Baba Reshi’s Dhaba
- Specialty: A popular spot for locals and yatris alike, this simple yet delightful dhaba offers rich, homemade-style curries, and rice dishes. It is particularly known for its vegetarian dishes such as Dum Aloo and Chana Masala.
e) Nedous Dining
- Specialty: Famous for serving some of the best traditional Kashmiri food, Nedous Dining offers dishes like Kebab, Mutton Yakhni, and traditional desserts like ‘Shufta’ (a dessert made of dried fruits and sugar) and ‘Kahwa’.
12. Nearby Attractions
| Attraction | Distance from Amarnath | Highlights |
|---|---|---|
| Srinagar | 140 km | Dal Lake, Mughal Gardens |
| Sonmarg | 40 km | Trekking, Thajiwas Glacier |
| Pahalgam | 45 km | Lidder River, Aru Valley |
| Gulmarg | 120 km | Skiing, Gondola ride |
1. Srinagar – 140 km from Amarnath
Highlights:
- Dal Lake: Famous for its serene beauty, houseboats, and shikara rides. Dal Lake is a perfect place to relax and enjoy the stunning views.
- Mughal Gardens: Includes iconic gardens like Nishat Bagh, Shalimar Bagh, and Chashme Shahi, which are known for their Mughal architecture and beautiful floral layouts.
- Shankaracharya Temple: A hilltop temple that offers panoramic views of Srinagar.
- Old City: Rich in history and culture, showcasing the beautiful old architecture, temples, and mosques.
Activities in Srinagar:
- Shikara Ride: Take a peaceful boat ride on Dal Lake.
- Shopping in Local Markets: Explore the vibrant Kashmiri handicrafts and woollen products.
2. Sonmarg – 40 km from Amarnath
Highlights:
- Trekking: Sonmarg is known for its trekking routes, such as the trek to Thajiwas Glacier and the trekking paths towards the Himalayan mountain ranges.
- Thajiwas Glacier: A scenic glacier that offers breathtaking views and is a popular destination for nature lovers and trekkers.
- Meadow of Gold: The name “Sonmarg” means “meadow of gold,” referring to the lush meadows covered with wildflowers in summer.
- Sindh River: Known for trout fishing, the river runs through Sonmarg’s lush green landscape.
Activities in Sonmarg:
- Camping: Enjoy camping by the Sindh River or in the meadows near the glacier.
- Fishing: A great spot for fishing enthusiasts with trout and other fish in the river.
3. Pahalgam – 45 km from Amarnath
Highlights:
- Lidder River: Known for its pristine waters, it is perfect for trout fishing and rafting.
- Aru Valley: A scenic valley offering a blend of natural beauty, trekking routes, and views of snow-capped peaks.
- Baisaran Valley: Sometimes called “Mini Switzerland,” this area offers meadows and panoramic views.
- Betaab Valley: A beautiful destination with lush green fields and picturesque views of the surrounding mountains.
Activities in Pahalgam:
- Trekking: Pahalgam offers several trekking opportunities, such as the trek to the Amarnath Cave or the nearby mountains.
- Horse Riding: Popular in areas like Baisaran, where you can explore the valley on horseback.
- Rafting: In the Lidder River, if you’re seeking adventure.
4. Gulmarg – 120 km from Amarnath
Highlights:
- Skiing: Gulmarg is famous for its ski resorts, especially during winter, attracting skiers from around the world.
- Gondola Ride: The Gulmarg Gondola is one of the highest cable cars in the world, offering stunning views of the snow-covered mountains.
- Alpine Meadows: The vast meadows here are great for scenic walks, photography, and enjoying the tranquil atmosphere.
- Golf Course: Gulmarg boasts a beautiful golf course, one of the highest in the world.
Activities in Gulmarg:
- Skiing: A major winter activity, Gulmarg offers great slopes for both beginners and experienced skiers.
- Trekking: During the summer months, you can explore scenic trekking routes.
- Cable Car Ride: Experience breathtaking views of the mountains from the gondola.
13. Festivals and Events
- Amarnath Yatra Opening Ceremony
- Shravan Mela in July-August
- Importance of Maha Shivratri
1. Amarnath Yatra Opening Ceremony
The Amarnath Yatra is one of the most important Hindu pilgrimages, drawing thousands of devotees to the Amarnath Cave in Jammu and Kashmir. The Yatra is typically conducted during the summer months, with the opening ceremony marking the beginning of this spiritual journey.
Step-by-Step Details:
- Date and Timing: The opening of the Amarnath Yatra generally happens in June or July, depending on the Hindu calendar. The ceremony is scheduled based on the auspicious dates marked for the event.
- Religious Significance: The Yatra is dedicated to Lord Shiva, who is believed to reside in the Amarnath Cave. Devotees travel to the cave to witness the natural ice Shiva Lingam formed in the cave, symbolizing Lord Shiva’s presence.
- Opening Ceremony:
- The ceremony is usually held at the Baltal or Pahalgam base camp, where the devotees begin their pilgrimage.
- The first group of pilgrims is led by priests who perform rituals and prayers to invoke Lord Shiva’s blessings for the safety and well-being of all those undertaking the Yatra.
- The Chadi Mubarak (holy mace of Lord Shiva) is also carried to the shrine, marking the beginning of the journey.
- Devotees’ Preparation: Devotees often perform rituals at home before leaving for the Yatra. Some prefer to take a holy dip in the nearby rivers before setting out for the pilgrimage.
2. Shravan Mela (July-August)
Shravan Mela is an important religious festival celebrated in the Hindu month of Shravan (typically falling in July-August). It is particularly observed in northern and western India, with a significant focus on devotion to Lord Shiva.
Step-by-Step Details:
- Date and Timing: The festival occurs during the Shravan month of the Hindu calendar. The month of Shravan generally starts in July and ends in August, with the festival spanning the entire month.
- Religious Significance: Shravan is considered the holiest month of the year for Lord Shiva devotees. It is believed that during this month, the divine energy of Lord Shiva is at its peak, making it an ideal time for fasting and prayer.
- Festivities and Rituals:
- Devotees visit Shiva temples, offer water, milk, honey, and flowers to Lord Shiva, and perform various prayers.
- The Shravan Somvar Vrat (fast on Mondays) is a key ritual, where devotees observe a fast on Mondays during Shravan, which is believed to bring blessings and fulfillment of desires.
- In many places, grand fairs (Melas) are organized, with vendors selling religious items, food, and other offerings. People gather in large numbers to celebrate.
- Cultural Activities:
- Devotional music, such as Bhajans and Kirtans, fills the air during the Shravan Mela.
- In some regions, the festival is marked by traditional dances and processions, particularly in temples dedicated to Lord Shiva.
3. Importance of Maha Shivratri
Maha Shivratri, one of the most revered festivals in Hinduism, is dedicated to Lord Shiva. It is a night-long festival celebrated with fasting, prayer, and devotion. The day is considered to hold spiritual importance, with many devotees observing fasts and engaging in rituals throughout the night.
Step-by-Step Details:
- Date and Timing: Maha Shivratri usually falls in the month of Phalguna (February-March) and is celebrated on the 13th night and 14th day of the waning moon in the month. The specific date is determined based on the lunar calendar.
- Religious Significance:
- Maha Shivratri is considered the night when Lord Shiva performs the Tandav dance, symbolizing the cycle of creation, preservation, and destruction of the universe.
- It is believed that worshiping Lord Shiva on this night grants spiritual upliftment, prosperity, and the removal of obstacles in life.
- Observances and Rituals:
- Devotees fast on this day, abstaining from food and water. Some follow a partial fast, consuming fruits or milk.
- Night-long vigils are held, with prayers and recitations of mantras, such as the Maha Mrityunjaya Mantra.
- Temples are decorated with flowers and lights, and the Shiva Lingam is bathed with milk, honey, water, and other offerings.
- Cultural Celebrations:
- In temples, there are special ceremonies and performances, including Bhajans and Kirtans.
- Some devotees visit temples at midnight, as it is believed that Lord Shiva’s divine presence is most active at this time.
- Global Celebrations:
- Maha Shivratri is celebrated worldwide, particularly in countries with large Hindu populations, such as Nepal, Mauritius, and parts of the Caribbean.
14. Photography Tips
- Best spots for photography: Amarnath Cave, Panchtarni, Sheshnag Lake
- Recommended camera settings for high-altitude photography
- Capturing sunrise and sunset views
1. Best Spots for Photography:
- Amarnath Cave:
- Overview: Amarnath Cave is one of the most significant pilgrimage sites in India, renowned for the naturally occurring ice Shiva Lingam. The cave is surrounded by snow-capped mountains, which provide a dramatic backdrop for photography.
- Best time to visit: Early morning or late afternoon to capture the changing light and avoid crowds.
- Ideal Shots: Wide-angle shots of the cave with the mountain range, close-up shots of the ice Shiva Lingam, and panoramic shots of the valley and surroundings.
- Panchtarni:
- Overview: A beautiful spot situated en route to the Amarnath Cave, Panchtarni is surrounded by clear streams and meadows, with snow-capped peaks in the background.
- Best time to visit: Morning when the light is soft, or sunset when the golden hour casts a warm glow on the surroundings.
- Ideal Shots: Wide-angle shots of the streams and meadows, capturing the expansive landscape. Close-ups of the wildflowers and birds. A panoramic shot of the mountains and the valley is also highly recommended.
- Sheshnag Lake:
- Overview: A serene alpine lake surrounded by lush green meadows and snow-covered mountains. The reflection of the peaks in the clear water creates stunning photo opportunities.
- Best time to visit: Early morning or late afternoon, when the sun creates long shadows and the lake reflects the mountains.
- Ideal Shots: Capturing the lake’s mirror-like surface, wide-angle shots of the entire landscape, and close-ups of any wildlife or flora around the lake.
2. Recommended Camera Settings for High-Altitude Photography:
High-altitude environments like Amarnath, Panchtarni, and Sheshnag can present unique challenges such as low light, sharp contrasts, and thin air. Here are the recommended camera settings to optimize your shots:
- Aperture:
- Use a smaller aperture (higher f-stop) like f/8 to f/16 to achieve a large depth of field, ensuring that both the foreground and background are in focus.
- Shutter Speed:
- If you’re capturing landscapes or panoramic shots, use a slower shutter speed (1/125s to 1/500s) to maintain detail in the image.
- For capturing motion, like flowing streams, you can experiment with longer shutter speeds (1/30s to 1/2s) to create a soft, silky effect on the water.
- ISO:
- At high altitudes, light can be harsh, so keep your ISO as low as possible (ISO 100-400) to minimize noise and achieve better image clarity.
- However, in low-light conditions like early morning or evening, you may need to increase the ISO (ISO 800-1600) to compensate.
- White Balance:
- Set the white balance to daylight to capture the natural colors of the landscape, especially if you’re shooting in bright sunlight. If you’re shooting during the golden hour, you can experiment with the cloudy setting to add warmth.
- Exposure Compensation:
- Due to the brightness at high altitudes and potential snow reflections, you may need to use negative exposure compensation (-0.3 to -1 EV) to prevent overexposure.
- Focus:
- Focus on the mid-ground for landscape shots, using manual focus if necessary to ensure sharpness across the scene.
- For close-up shots, use a macro lens if available, and focus on specific details like flowers, rocks, or wildlife.
- Lens Choice:
- A wide-angle lens (16-35mm or 18-55mm) is ideal for capturing vast landscapes and sweeping panoramas.
- For specific details or wildlife, a telephoto lens (70-200mm) will be useful for close-up shots without disturbing the subject.
3. Capturing Sunrise and Sunset Views:
- Golden Hour Photography:
- The period shortly after sunrise and before sunset, known as the golden hour, offers soft, warm light that is ideal for photography. This light helps to add depth and dimension to your photos.
- Sunrise: Position yourself so that the first light of the day hits the landscape, illuminating the mountains, valleys, and lakes with soft golden hues. The light is usually softer in the morning, making it perfect for capturing the texture and detail in the landscape.
- Sunset: The evening light is also rich in color, with warm tones of orange and pink. Capture the light hitting the landscape from different angles and use silhouettes (such as trees, mountains, or people) to create contrast against the vibrant sky.
- Composition:
- Leading Lines: Use the natural lines of the landscape (e.g., roads, rivers, trails) to guide the viewer’s eyes through the photo.
- Rule of Thirds: Place the horizon or key elements off-center to create a more dynamic composition. This helps to highlight the sky and land equally.
- Reflections: If you’re near a lake, capture the reflections of the mountains and sky in the water, particularly during calm conditions at sunrise or sunset.
- Camera Settings for Sunrise/Sunset:
- Aperture: Set to f/8 to f/11 to capture as much of the scene as possible in focus.
- Shutter Speed: Keep a moderately fast shutter speed (1/125s to 1/500s) to avoid overexposing the highlights while still capturing the landscape in good detail.
- ISO: Lower the ISO (100-400) to avoid noise, but if the light is low, you may need to increase it to maintain a good exposure.
- Filter: Use a graduated ND filter to balance the exposure between the bright sky and the darker landscape.
4. Additional Tips:
- Prepare for the Altitude: The high altitude can cause fatigue and make you more prone to altitude sickness. Keep water on hand and take breaks between shoots to avoid exhaustion.
- Protect Your Gear: The weather in high-altitude areas can change rapidly. Use weatherproof gear or a camera rain cover to protect your equipment.
- Manual Focus: In conditions with low light or rapid changes in scenery (e.g., clouds moving across mountains), autofocus can struggle. Use manual focus to ensure sharpness.
- Bring Extra Batteries: Cold temperatures can drain camera batteries quickly, so make sure you carry extra batteries and keep them warm.
- Tripod: A tripod is essential for capturing long exposures and maintaining sharpness, especially in low light or when shooting in the early morning or late evening.
15. Budget and Cost Estimate
| Expense Type | Approximate Cost (INR) |
|---|---|
| Travel (to and from) | ₹5,000 – ₹15,000 |
| Accommodation | ₹500 – ₹10,000 per night |
| Food | ₹300 – ₹1,000 per day |
| Trekking Gear | ₹1,000 – ₹5,000 |
| Miscellaneous | ₹2,000 |
1. Travel (to and from)
Approximate Cost: ₹5,000 – ₹15,000
Details:
- Transportation Mode: This includes the cost of train tickets, bus fares, or airfare (for longer distances). The cost will depend on the mode of transport and distance to the destination.
- For example, traveling by bus or train can be more economical (₹5,000–₹10,000 for shorter distances).
- If air travel is involved, the cost can increase significantly (₹12,000–₹15,000 or more for flights).
- Additional Considerations: Booking in advance can often result in better rates. Keep in mind peak season travel costs may increase.
2. Accommodation
Approximate Cost: ₹500 – ₹10,000 per night
Details:
- Budget Options: In cities or smaller towns, basic accommodation like guesthouses or dormitories can cost between ₹500 and ₹2,000 per night.
- Mid-Range Hotels: For more comfort and privacy, mid-range hotels typically charge ₹2,000 – ₹5,000 per night.
- Luxury Stays: If you prefer luxury resorts or boutique hotels, the cost can go up to ₹8,000 – ₹10,000 per night.
- Camping or Homestays: If your trip involves trekking, you might also find homestays or campsites available for around ₹500 – ₹2,500 per night, depending on the location.
3. Food
Approximate Cost: ₹300 – ₹1,000 per day
Details:
- Basic Meals: If you are eating at local eateries or small food joints, expect to spend around ₹300 – ₹500 per day on meals.
- Mid-Range Dining: For a more comfortable dining experience (restaurants with decent amenities), the cost can range from ₹500 – ₹800 per day.
- Higher-End Meals: For fine dining or staying in luxury hotels that offer premium meals, you may end up spending ₹1,000 or more daily.
- Self-Catering: If you plan to cook your own meals (especially for camping or trekking), your food costs could be reduced to ₹100 – ₹300 per day depending on local market prices.
4. Trekking Gear
Approximate Cost: ₹1,000 – ₹5,000
Details:
- Basic Gear: Basic trekking gear such as shoes, water bottles, or backpacks can range from ₹1,000 to ₹3,000. For a simple trek, basic gear may suffice.
- Intermediate Gear: If you need specialized trekking shoes, waterproof jackets, or other intermediate-level equipment, you may need to spend ₹3,000 – ₹5,000.
- High-End Gear: For advanced treks or expeditions, high-quality trekking gear like climbing shoes, hiking poles, tents, and sleeping bags can cost even more, though these are usually not needed for shorter or less challenging treks.
5. Miscellaneous
Approximate Cost: ₹2,000
Details:
- Souvenirs: You might want to buy local souvenirs or handicrafts, which can cost anywhere between ₹500 – ₹2,000 depending on the location.
- Guides and Permits: If your trek requires a guide or specific permits (for restricted areas), you should budget around ₹1,000 – ₹2,000.
- Contingency Fund: It’s always a good idea to keep a small amount aside for unexpected expenses, such as medical emergencies or transportation changes.
16. Travel Tips and FAQs
- Best travel months
- Recommended fitness level
- Medical facilities available
- Contact numbers for local authorities
1. Best Travel Months
- Best Time to Visit:
- The ideal travel months for Iran are March to May and September to November. During these months, the weather is mild and pleasant, making sightseeing and outdoor activities more enjoyable.
- Spring (March-May) is especially beautiful with blooming flowers and moderate temperatures.
- Autumn (September-November) is another great time with cooler weather and fewer tourists compared to peak summer months.
- Avoiding Peak Summer:
- Summer (June to August) can be extremely hot, especially in desert areas. Temperatures often rise above 40°C (104°F), which may make outdoor activities difficult, especially in cities like Tehran, Yazd, and Isfahan.
- Winter (December-February) can be cold, especially in northern and mountainous regions, though it is still a good time for skiing in places like Dizin and Shemshak.
2. Recommended Fitness Level
- General Fitness:
- For the majority of travelers, a moderate fitness level should suffice. Exploring cities like Tehran, Isfahan, and Shiraz may involve walking and climbing stairs in historical sites such as Persepolis, Nasir al-Mulk Mosque, and other landmarks.
- It’s recommended to be able to walk for several hours and manage moderate heat or cold depending on the season.
- Special Activities:
- If you plan on visiting mountainous regions or engaging in activities like hiking, trekking, or skiing, it’s best to have a higher level of fitness. Some routes require stamina for steep climbs or long distances.
- Health Precautions:
- While hiking or walking in hot climates, staying hydrated is crucial, especially in desert regions. Carry a water bottle and wear comfortable shoes.
3. Medical Facilities Available
- Health Services:
- Iran has both public and private medical facilities. Major cities like Tehran, Isfahan, and Shiraz have reputable hospitals with modern equipment and healthcare professionals.
- If you need emergency medical services, you can call 115 for ambulances. Private hospitals typically have English-speaking staff.
- Medication and Vaccinations:
- Bring any personal medications, as some may not be easily available in Iran. It’s also advisable to get travel insurance that covers medical emergencies.
- Recommended vaccinations for travel to Iran include Hepatitis A, Hepatitis B, Typhoid, Diphtheria, Tetanus, and Polio.
- Pharmacies:
- Pharmacies are widely available in cities and can provide over-the-counter medications for minor ailments. It’s always a good idea to carry your prescription if you need specific medication.
4. Contact Numbers for Local Authorities
- Emergency Services:
- Ambulance: 115
- Fire Department: 125
- Police: 110
- Tourist Police (for help with lost items or tourism-related issues): 110 (also in some places, you can visit the nearest police station directly for assistance)
- Tourist Information:
- Iran Tourism and Touring Organization (ITTO): You can contact them for advice and updates on tourist destinations.
- Iran Consulate and Embassies:
- If you need consular assistance or have a lost passport, the consular office of your respective country will be your first point of contact.
- Other Useful Numbers:
- Local hospitals (Tehran): 021-66912525, 021-66902023
- Local Taxi Services: While you can use local taxis, services like Snapp or Tap30 are also available via apps and provide more comfort and transparency.
- Internet Access for Communication:
- You can also use mobile apps (e.g., WhatsApp) to communicate. Iran has good internet coverage in cities, and mobile phones generally work well.